Thursday, March 28, 2013

We finally fixed the dishwasher!

So, about 2 months after I initially broke our dishwasher, we finally got around to fixing it.

Just for reference, we have a Whirlpool dishwasher (model #DU1345XTVQ0) and I love it.  I just put some Bar Keeper’s Friend in there and broke it.  There was a slow, dripping leak coming from the motor area. (And it turns out, somebody (coughcoughBrian) often leaves napkins on his plates when he’s putting them in the dishwasher and those napkins weren’t helping either.) 

We ended up installing a new motor.  Thanks to the Internet, I found a motor at our local appliance parts store, Bell Parts, (you can also order online!), and some instructions on how to do it.  The instructions weren’t for our dishwasher exactly, but they were close enough that we were able to uninstall and re-install everything we needed to!  (It was also helpful to have our dishwasher’s manual and parts list in front of us, too!)

Again…I do not recommend that you do the crazy things we do (like take apart and fix your own dishwasher)…but for us, it was better than buying a new one! It might be for you, too!

fixing the dishwasher

So, I thought we’d have to take out the whole dishwasher, but we didn’t.  We could unplug and remove most things from underneath.  It was a little tight, and Brian and I took turns working down there. 

Eventually, we got the sump and motor out of there.

dishwasher sump and motor

Here’s the floor showing through the hole when we got everything out.

dishwasher...with most of its insides removed

Once we had the sump and motor out, we took off the old motor.  (It was so easy compared to getting all the stuff out from underneath the dishwasher!)  We did find some nasty gunk (Bar Keeper’s Friend + napkins?!)  on some screens in there.  I don’t know if that gunk was contributing to the leaking, but I cleaned it all anyway, to be safe.

dirty screen from inside there!

Easy peasy was installing the new motor.

putting on the new motor

And then it was just a matter of putting it all back together.  Somewhere in the un-installing process, Brian got all kinds of cuts on his hands and he’s not sure how.  In the whole fixing process, we only got on each others nerves once and had to take a dinner break. Not bad. :)

Once it was all back together and running, it was soooooo great to see a dry floor underneath the motor! No leaks!

no leaks!

And now I have my dishwasher back.  I actually haven’t had a dishwasher for that long in my life…but it’s amazing how quickly I got addicted to it.  I mean, you put your dirty dishes in this magical machine and press a button…and pouf! They come out clean and dry! It really is like magic. :)

Have you lost anything lately, no matter how small, that you normally take for granted? :) Did you get it back? And are you as happy about it as I am? :)

Wednesday, March 27, 2013

Happy Birthday, Mom!

I just want to send a little birthday shout-out to my mom!

Happy Birthday, Mom!

She’s a very good lady to put up with me all the time!

Have a happy happy day, Mom! :)

Super Delicious Veggie Fajitas!

These all-veggie fajitas are one of the most delicious things I have made lately. They’re healthy and they’re so good, that you really don’t miss the meat!  I  haven’t made anything too terrible in my healthy-cooking escapades lately, but this is the first meatless meal that Brian and I have both found 100% satisfying – something that we would eat even if we weren’t trying to be healthy!

best veggie fajitas!

I was inspired by my friend’s delicious smelling tacos last week, so I decided to try some home-made fajitas…and hopefully make them kind of healthy by using just veggies.  I browsed the web (of course) and found this recipe for fajita spice mix and this recipe for some ingredients and cooking tips and then I adapted it all for myself. 

Here’s what I did:

Veggies:

  • 1 large onion, sliced into big slices
  • 1 green bell pepper, cut in to 1/2” strips
  • 1 red bell pepper, cut in to 1/2” strips
  • 1 orange bell pepper, cut in to 1/2” strips
  • 1 medium zucchini (about 8” long) cut in half, then into strips
  • 10-12 mushrooms, sliced (I used a mix of crimini and button)

Fajita Seasoning Mix:

  • 2 tsp garlic salt
  • 2 tsp chili powder
  • 1 tsp paprika
  • 1/2 tsp onion powder
  • 1/4 tsp (or a dash in my case) cayenne pepper

I tossed all that stuff in a gallon Ziploc bag with some olive oil so all the veggies were nice and coated.

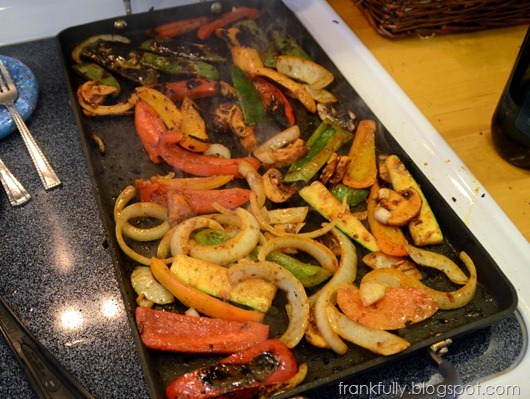
I heated up my griddle pan to just under high (8 or 9 on my electric stove) with some olive oil.  Then I proceeded to cook (and nicely char…nicely nicely charred) all the veggies.

veggies cooking on the griddle

All those veggies made a LOT of fajitas.  Brian and I totally overate and there were still plenty of leftovers…but that was good for us: easy lunches the next day!

Here’s the veggie pile beginning…like I said, they were very charred…and super delicious! (I was eating them right off the plate as I was cooking!)

yummmm...super charred veggies

To serve, we heated up some white corn tortillas in the microwave (and I fried a couple, too, in the pan…which of course were delicious), added some chopped fresh cilantro, some thinly sliced chopped raw onions, and a sprinkle of Mexican cheese. 

best veggie fajitas!

This amazing veggie fajitas are currently one of our favorite meals! I’ve made them twice in a week, and we’ve been eating all the leftovers in between!

Are you into trying a meatless meal…if it tastes this delicious??? :) Have you been doing as much cooking as I have lately?

Tuesday, March 26, 2013

Roasted Red Pepper Soup

I posted a while ago about making some roasted red pepper soup (whose recipe I found on Joyful Abode), and it was so good, that I have since made it again…so I thought I’d share some pictures. :)

(I’m not going to re-post the recipe, I will just send you to Joyful Abode where you can see how to roast the peppers and make the soup.  I just want to inspire you to go there and actually do it!)

Here are peppers (orange and red) I roasted a day or two before and put in the fridge in some olive oil:

roasted peppers in oil

Here’s the soup beginnings…butter, onions, garlic, and roasted red (and orange in my case) peppers:

red pepper soup begins

After everything’s been added (there’s some broth and basil) and simmered, I blend it with an immersion blender:

immersion blender in red pepper soup

Then add some cream (which could really be optional, I’ll bet), and soup’s done!

roasted red pepper soup

I couldn’t get a good picture of the soup in a bowl (and I should have garnished it…isn’t that what all the pros do?) so I hope this picture makes you want to make and eat it:

roasted red pepper soup

(I did put some cheese on top and it was already starting to melt in…)

Since this winter seems never-ending, a good bowl of soup is in order, right? :)

Thursday, March 21, 2013

Healthy Deep Dish Cookie Pie

Lately, work and life has kept me pretty busy, so some DIY projects (like this and this) are just temporarily on hold.  But, in the spirit of trying to become healthier, I have been cooking up a storm…making your own healthy meals is just another form of DIY, right?

As I was exploring the internet for new recipes, I came across this gem of a blog: Chocolate Covered Katie.

It is full of healthy, delicious desserts. That’s right. I said desserts.

So far I’ve tried her cookie dough dip (sooo delicious) and her deep dish cookie pie.

Chocolate Covered Katie
Photos from Chocolate Covered Katie

So far, those desserts were both so easy! Combine everything in a food processor and go!

DSC_0987
Yes, those are chickpeas! Don’t tell anyone what’s in the dessert and they will never guess! These desserts really are so good!

Here’s my deep dish cookie pie:

DSC_1001

I forgot to get pictures of it all sliced up and styled because we ate it too fast! I brought some to work and nobody believed it was chickpeas or “healthy”!

And a lot of her recipes are vegan (or mostly vegan!) – even if you’re not vegan or have no interest in becoming one, it means no raw eggs in the cookie dough dip! Which means you can finally eat all the cookie dough you want without feeling guilty. :)

Have you found any good new blogs lately? Any new food adventures? I’ve got a few more to share, too!

Wednesday, March 13, 2013

Cole’s Birthday Party!

I want to share a few pictures from Cole’s birthday party!

There was a LOT going on – and a LOT of friends and family over to celebrate, so I didn’t get as many pictures of the little guy in his various outfits as I would have liked. I’m sure his parents got plenty, and I’ll get some from them sometime. :) But here are a few good ones:

Cole got a new Radio Flyer wagon that he rode in with his cousins:

Cole in his wagon!

And he posed for me during his little meal after most people left:

Cole!

What a cutie. He looks so good in his sock monkey bib. :)

His mom, Cassie, had some great decorating details. The house was full of paper lanterns and balloons.

cute balloons and paper lanters

She painted some letters in coordinating colors to spell out his name.

awesome painted letters spelling out COLE

And my “happy birthday” bunting/banner was much larger than expected! But it hung across a big wall in their living room nicely.

the huge happy birthday bunting!

Here’s another angle, because I know you were dying for it.

Happy 1st Birthday Cole!

There you have it!

Happy 1st Birthay, Cole!

(If I get any more pictures of him in his shirts, I will share them!) :)

Tuesday, March 12, 2013

The New AeroGarden is Here!

My new Aerogarden is here, and I couldn’t get it out of the box and set up fast enough last night!

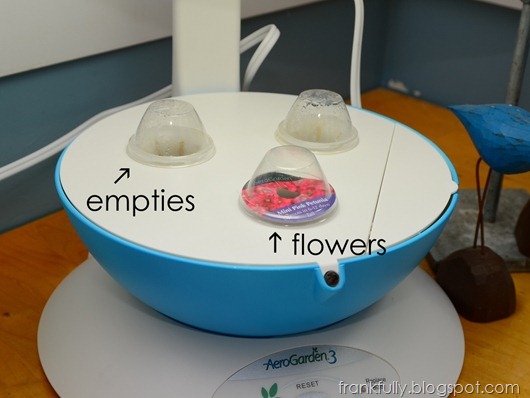
my new AeroGarden! planted 3/11/13

So far, I’ve planted it with one pod of flowers, leaving the other two empty. My idea is to get those little flowers started (with the light nice and low to them) so I can transplant them into the other AeroGarden – in the hole left by my dead cilantro.  Then start a whole new garden in there!

starting 1 pod of flowers in the AeroGarden, 3/11/13

Let’s see if this germination/transplantation experiment works. :)

Here are my two AeroGardens side by side:

my 2 Aerogardens!

I’ve trimmed down the basil a lot, and I can’t wait to trim it down some more, so I can lower the light a little (to help the new flowers when they get transplanted there!) and hopefully encourage some new basil growth.  But I am trying to wait! I don’t want to get over zealous here. :)

Also, AeroGarden suggests you change the grow light bulb every six months. I’ve had my first Aerogarden for over a year and hadn’t changed the bulb yet. I ordered new bulbs along with my new garden and changed the bulb last nigh. What a difference!

The old light bulb:

old Aerogarden light

And the new light bulb:

new Aerogarden light

I’m glad I changed it.  Especially with the shiny new AeroGarden sitting next to it. Oh yeah, and to help the plants, too. :) :) :)

I’m excited to watch these babies grow, again! I will keep you updated. :)

Related Posts Plugin for WordPress, Blogger...