Showing posts with label unfinished. Show all posts

Friday, August 15, 2014

Chair Ideas

As if I need another project to remain unfinished (ahem, sewing room dresser, bathroom, nursery, etc), I’ve been thinking about what I can do to update this chair.

20140814_214616 Forgive the cell phone pic!

With new baby in the house, this chair from my mom’s has been a godsend. It’s in great shape (my mom had gotten a new cushion for it a while ago, so it feels new), it’s comfy, and it’s easy to get in and out of while carrying a heavy baby. :)

I think a getting it totally reupholstered in a silver-gray, keeping the tufts, would be gorgeous.  Something like this:

gray tufted chair image via

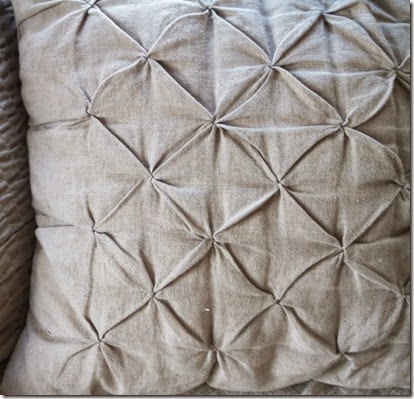
But truthfully, that is probably not going to happen. So I have been dreaming about a DIY-type covering that I could do. I’ve been toying with the idea of smocking. Wouldn’t something along these lines look cool on the back?

smocked-cushion-detailImage via

Or something like this

But, truthfully again, with a little baby in the house and trying to find that baby/work/life/life-with-baby balance, this project will probably remain one I am just dreaming about for a while…while I spend my time looking at/sitting in this old green chair. :)

So for fun, here is a baby picture. :)

DSC_0386

What projects have you been dreaming about lately? I should also attend to my yard at some point…I have big dreams for out there, too. :)

Monday, July 14, 2014

Nursery in Progress

Much like most of the projects in our house, the baby’s nursery is about 90% done. Why, oh why, won’t I complete projects? :)

But anyway, here it is…in progress :)

nursery in progress (polka-dot bedding from Ikea)

nursery in progress (Dream on Me Synergy crib)

changing table (clock and London print from Ikea, Indiana print from Etsy, Zutano Elephants changing pad cover)

crib (I know you’re not supposed to have anything in the crib, but since for a long time, the baby wasn’t actually sleeping in there, these fun guys were its only inhabitants.) :)

And here’s what baby sees when he does spend time in his crib…
alphabet zoo mobile (Skip Hop Alphabet Zoo Mobile – we actually tacked the animals’ legs together so baby could see their faces when he’s lying down in the crib)

I actually already have the art to hang (Paul Thurlby's Alphabet for above the crib, and some cool collected prints/homemade Cricut art for above the bed) but haven’t done it yet! Lazy!

And I just realized as I’m looking at these pictures, that I have made some fun blue striped curtains that are already up…I’ll have to take updated pictures soon.

Anyway, that is where baby officially resides…90% done. But, considering that 3 days before he was born, we were still getting it ready/putting together the crib…

nursery in progress (Thanks to our friend Efren!)
nursery in progress (This is the last pregnant picture I have of myself before the day he was born!)

and that less than a month before he was born it looked like this…

 baby's room before

…I’m pretty happy with how far it’s come along! :)

Friday, January 24, 2014

New Year Updates

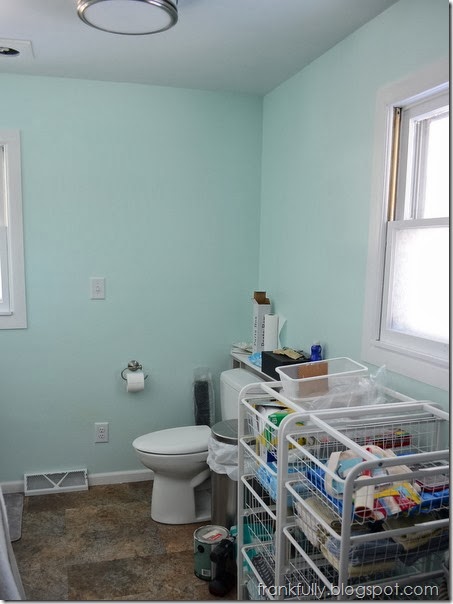
The bathroom is pretty much finished!

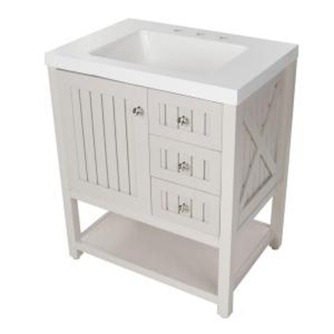
bathroom vanities

Okay, okay, so we actually have quite a few more projects to go. But we are using it and it is amazing!

In between the vanities, I will buy/build something to make everything look more seamless and super functional.  My plan is to put up a subway tile backsplash in the whole vanity area, too.

bathroom

We’ll get rid of all the extra tools and paint :)  Above the toilet will be some cool shelves, and I want to hang some art and/or mirrors. These inexpensive and functional Algot drawers from Ikea will be surrounded by a faux-cabinet to match the vanities and make them look like a built-in.

shower

The shower still needs a real curtain (we’re just using this liner for now on a curved shower curtain rod, which is amazing).  There’s a little touch up caulking and painting that needs to get done, too.

And we need some artwork and other fun things to fill this large bathroom up.

bathroom

But overall, I am so happy with what this room looks like and how it functions compared to 4 months ago and the 3 years before that!

DSC_0143

A little run-down of what’s currently in the bathroom:
- Martha Stewart Vanities from Home Depot
-Toto Toilet from Amazon
-Price-Pfister Faucets from Lowe’s
-Delta Showers from Amazon
-Tile from Menards
-Allure Flooring from Home Depot
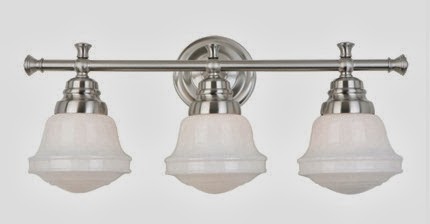
-Vanity Schoolhouse Lights from Destination Lighting
-Exhaust Fans/Lights from Menards
-Medicine cabinets from Lowes
-Hooks and hardware from TJMaxx/HomeGoods
-Zinsser Perma-White Mildew-Proof Paint (colormatched to Pittsburgh Paints Splash) from Menards

My goal is to go back and show you some more progress pictures/steps. Cross your fingers that I actually do it :) and of course more progress pictures as it gets more finished/decorated. :)


In baby news, I am 34 weeks along and should really get started on that nursery…baby’s due March 1st and that is really coming up fast!

DSC_0226

But for now, try to stay warm!!

Thursday, November 7, 2013

The Bathroom Has Drywall!

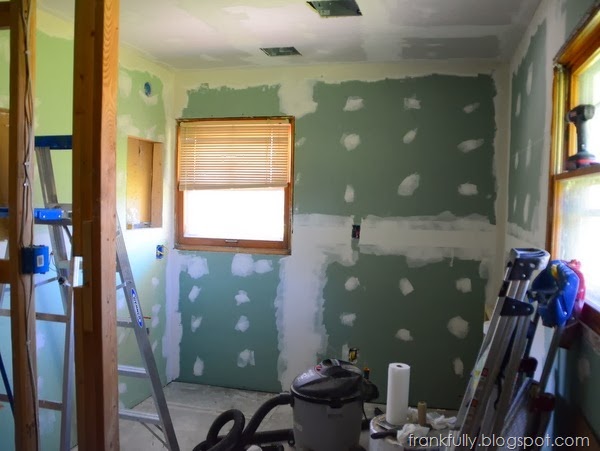
The bathroom is about 90% drywalled (only 90% due to some snafus) and it has been for about a month now.

bathroom drywall

To do the ceiling, Brian and his stepdad rented a drywall lift from our local Menards, and they said it was worth every penny!  (Call around when you’re renting tools. We’ve rented lots of tools from Home Depot and our local rental place, but for some reason renting this drywall lift was half the price at Menards than anywhere else!)

drywall lift

This amazing contraption holds the drywall up in the air so you don’t have to! You can use it to hang high vertical sheets as well, but we just used it for the ceiling. Having it was like having a third set of tireless hands and arms on your side and gave us the opportunity to make the many many cut outs we needed for all the lights/fans/etc.

drywall lift

This isn’t a terribly big room, but all those cut outs took time – and we’re no pros! The ceiling took about 5ish hours including breaks and mess-ups :) and only cost about $20 in drywall-lift-rental.

bathroom drywall

All in all, most of the drywall installation has been straightforward and quick. The mudding is a pain as always, but it’s coming along…if only there were some magical tool for mudding and sanding the ceiling, I’d be set!

The shower installation is becoming a dramatic saga, and that’s what’s currently been holding this project up. Ah, the joys of home improvement and DIY. Once we actually get near a “finished” stage on that, I will tell you all about it!

Friday, October 4, 2013

Bathroom–Ready for Drywall

There was so so much behind-the-scenes/walls work that went into the bathroom over the last 2 weeks. Brian and his various helpers installed all the new plumbing – that is plumbing for 1 toilet, 2 vanities, and 2 showers, as well as the appropriate venting to go with all of it.  They also ended up installing new electric as well as fixing and rerouting some existing. Whew!
So I don’t have a lot of that to show you, (although we are running all our new plumbing in PEX and it’s all controlled by this cool manifold which is like a breaker box but for your water. I should get Brian to help me post about that sometime) but I’ve got a few pictures of what the room looks like now.
bathroom - framing for medicine cabinets
These are the frame-outs for the future medicine cabinets. You can see the blue and red PEX plumbing as well as the white drains and vent pipe.  And all those lovely blue electrical boxes! I love DIY-ing this stuff because really, I need lots of outlets in a bathroom and I don’t want to argue with anyone about it. :)
bathroom - plumbing for toilet
Here’s where the toilet will go (like our chalk outline of it?). We had to build that little wall that will go behind it because it’s above the electrical breaker boxes in the basement, and you need so much clearance between the toilet drain and the breakers. Water + electricity don’t mix.
bathroom insulated
Here’s everything with new insulation, ready to be drywalled!
And just a side note – Brian took out this ceiling light box when he was re-doing the electric and I made him save it so I could take a picture.
electrical box with burnt wires
Those white wires coming out of the box are burnt, not dirty.  This is what happens when, for instance, you put 100 watt light bulbs in fixtures that are rated for 60 watts (or some other similar situation).  Of course, sometimes it’s hard to know because old fixtures didn’t necessarily have those safety stickers that new fixtures do, but those things aren’t jokes! If you want light brighter than the fixture is rated for, either use lower-wattage CFLs or LEDs or get a new fixture. You don’t want to risk burning things up in your ceiling!
Tomorrow morning, we are going to start working on the ceiling drywall. Brian is definitely renting a lift for that, so I’m excited to see how it goes.
Have a great weekend!

Friday, September 27, 2013

Bathroom Plans

As we’re constructing things in the bathroom, I’ve been really having to make choices on what will be going in there since we have to plan for everything to make sure we rough-in walls and plumbing and electrical in the right places.  It’s totally fun, of course, but a little nerve-wracking since these choices will be pretty permanent – bathroom stuff is expensive and not easy to change out! :)

I’ve been using an Amazon Wishlist to gather all the different items I’m finding.  It’s nice because you can use the universal wishlist button to find things from other sites, and Amazon will also tell you if it’s available on their site as well. The Invisible Hand plug-in is amazing for this project, too, because it’s helping me shop for the best price with minimal effort.

So, here goes. Here’s what I’ve picked so far.

We’re so far sticking with this vanity from the Home Depot.  The sink isn’t as deep as I’d like, but it’s the same depth as our sink now, so I know it will be fine, and coupled with a nice faucet, I think it will work out really well. We’ll have two of these vanities with some sort of drawer unit in between.

martha stewart vanity

For above the vanities, I bought these recessed medicine cabinets from Lowe’s. I love that they have mirrors on the inside as well! They’re nice and large! I wanted a larger version, but Brian’s stepdad made me worry that cutting out too many studs might compromise the drywall and shelves in our closet on the other side. If I feel like I need more mirror space, I know I can creatively hang another one in between the vanities or something.

kohler medicine cabinet

Right now, these are my first choice for above-the-vanity light fixtures. :) I just like them. But I’ve found a few similar ones just in case these don’t work out for some reason.

allen roth light fixture

In our master bath, we’re going to have a nice big shower with two showerheads and a handheld shower.  I ordered this unit from Lowe’s.  It looked pretty sturdy in the store, so I’m curious to see how well our installation will go. :)

sterling shower unit

We love Delta shower fixtures because you can control the temperature separately from the flow – meaning you can set your favorite temp and then not mess with it when you turn the shower on or off…so it’s always ready to go for you! I love it so much. We’ve had these kind of showers for years and won’t go back!

delta leland shower trim

(Note, when you get a Delta shower fixture, you have to buy the valve separately.)

At our last place, our plumber recommended Toto toilets to us and they’re amazing! I know it’s weird to talk about a toilet, but seriously, these toilets are amazing.  They have a larger flush valve than most toilets meaning they rarely get clogged, and they use less water!

toto drake toilets

We’re deciding between an elongated bowl and a round bowl. Haha, do you have any thoughts? Grandpa says he likes the elongated. :)

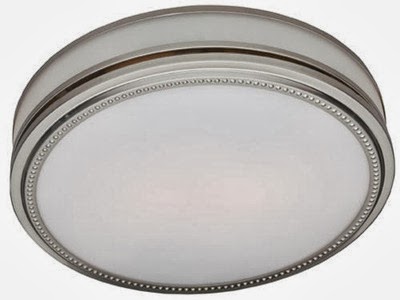
I chose these bath fans from Menards because they have a light (it uses 2 bulbs – and mini CFLs fit!) and they’ve got a pretty high CFM and are pretty quiet. And they’re pretty, of course. :)

riazzi bath fan

I’m still looking for sink faucets – but they’re not a top priority currently, and it will just come down to them being the right dimensions to make the best use of our sinks…and the right price of course!

So far, almost all of the plumbing and electrical is roughed in! Woohoo! I can’t wait to actually be able to start installing these fun things!  And to pick a paint color…

What have you been up to this week?

Friday, September 20, 2013

Bathroom Demolition

So last week, we got the bathroom demolished :) and began working on construction (which of course goes much more slowly!).  Here’s a little re-cap of the demo.

bathroom before

Here’s where we started. Our goals were to take out the hardwood floors (originally, we weren’t sure what we were doing with the flooring in there and we built that wall on the left side of the picture on top of the existing floors) and to take out some of the drywall on the exterior walls so we could put in new insulation.  That stuff would pave the way for the new plumbing and electrical work we’d have to do. We also realized we’d have to move some of the heat ducts.

Taking down drywall looked like this:

taking drywall downtaking drywall down

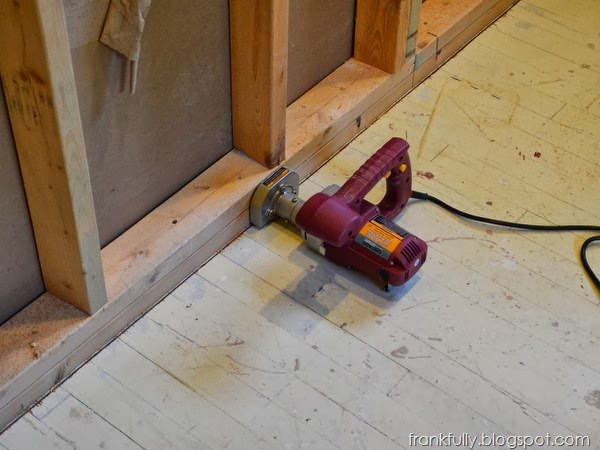
Then we got to work removing the floors. Like I said, the wall on the left was built on top of the existing hardwood, so we needed something that would cut the wood right against the wall – which a regular circular saw won’t do.  Luckily, I watch a lot of This Old House and I discovered that there is something called a toekick saw designed exactly for this purpose. (Really, it’s to cut flooring out from next to the toekick on kitchen cabinets.)

We bought ours at Harbor Freight Tools – our favorite place for inexpensive tools that we amateurs really won’t be using too often.

toekick saw from Harbor Freight

Here’s the toekick saw in action.  Look how it cut right next to the wall – and you could guide the saw against the wall to make a perfectly straight cut.

toekick saw in actiontoekick saw in action

Then we got to work pulling out all the floor boards which were nailed in.

taking up the hardwood floors

The subfloors underneath were only 1/2” (I wish they were 5/8” for strength) and weren’t put in in the smartest fashion (lots of corners and seams meeting in bad places) so it seemed a little weak.  But we decided that since we were putting concrete backerboard down, it’d be okay, so we didn’t replace the subfloor. We also decided that under key areas like the toilet and shower drains, we’d go down in the basement and add some 2x4 supports.

Here’s a bad picture that shows the concrete backerboard floor. :)

concrete backerboard floor

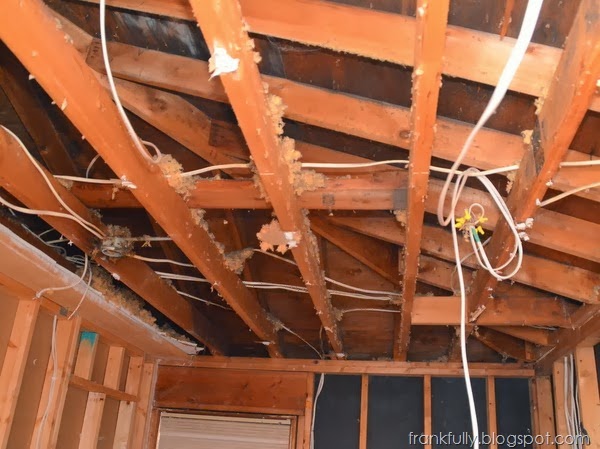
Lastly, but certainly not least, we ended up deciding that taking down the ceiling drywall (and having to re-drywall it later) would be better in the long run since we want to install so many things up there! Speakers :), heat lamps, lights, and exhaust fans. Doing all that work would certainly be easier with full access to the ceiling – and not having to climb into our attic with its super shallow hip roof.

But it resulted in this mess!

taking down the ceiling!taking down the ceiling!

Luckily, Grandpa and Brian’s stepdad are amazing and did all that nasty work as well as cleaning it all up!!

So that, I think is the demo in a nutshell. I’ll be posting the cool finishes that we’re (hopefully) installing and of course, about the construction as it goes along.

What have you been up to this week?

Friday, September 6, 2013

Making Way for a New Bathroom

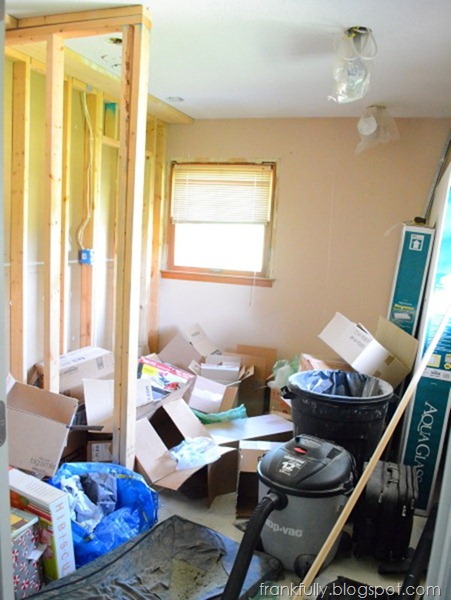
Late post today…because I have been cleaning out the part of our old third bedroom that is (hopefully) soon to become our master bathroom!

Until very recently, it looked like this…it was even worse at times!

DSC_0143

It served as a total junk room – full of packing boxes and Christmas things and just as a general home for things I didn’t know what to do with or want to deal with! :)

But as of now, it looks like this!

DSC_0941

Not bad, eh?

There is a LOT of work to do in here! Plumbing, of course, but we’ll also be taking out the current hardwood floors and laying new subfloor and maybe/hopefully some sort of floor-warming system underneath whatever floors we choose.  We’ll be re-insulating the outer walls and re-directing the vents in some way or another. We also have to re-do some electrical work that we already did a few years ago since in that time the bathroom layout plans have changed.

Just for fun…we’re considering using these vanities from Home Depot:

martha stewart vanity

And that seems to be the main thing I know right now :) I’m not even sure what color I’d like to paint the room. :)  I’ve started looking up some plumbing fixtures online (we like Delta showers because you can change the temperature independently of the on/off/flow…so you can pick a temp you like and keep it there! I’ll post more about that as I find our fixtures) and started looking into flooring and medicine cabinets and whatnot.  The finishes are so fun in a bathroom, but of course, so so much of the work is electrical and plumbing. I want really good exhaust fans if possible! The humidity in bathrooms seems to wreak havoc on anything inside of it!

Hopefully we’ll make quicker progress in the bathroom than on most of our projects :) so stay tuned. :)

What have you been up to this week? Any advice on exhaust fans?

Thursday, May 2, 2013

Living Room Curtain Fabric Purchased!

I finally took the plunge and bought 12 yards of this fabric for my living room curtains (from OnlineFabricStore.net) thanks to a $5 off coupon posted on Facebook!


I'm pretty excited for it to come! I know I have a million projects in progress (yard, sewing room, life, living room chairs to be recovered) but I hope I get on this one soon.  It should be pretty simple and I think it will make a big impact on the living room.

I think I'll swing by JoAnn's later today for some lining. Their home dec fabric is all 50% off and there's an extra 15% off coupon through Saturday. Gotta love multiple discounts!

What (many) projects do you have going on?

Tuesday, February 19, 2013

How Should I Refinish This Dresser?

Wow, I’m just asking for all kinds of help lately, aren’t I? But isn’t that what blogging is all about? :)   So, do I paint it or stain it?

sewing dresser
Images from here and here.

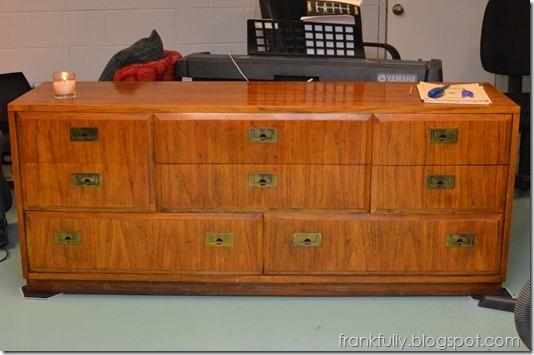
Okay, so here’s what’s going on. As a part of the great sewing room organization of 2013, I figured I should actually start working on this dresser I got from my aunt.

sewing room dresser being sanded

See all that junk on top? Yeah, this dresser’s just been sitting here collecting junk, which is pretty much the opposite of its intended function. (The junk is supposed to go inside the dresser, not on top.)

Last year (or longer ago than that?) I got this dresser from my aunt. It used to be my lola’s (Filipino grandma) and it’s just been sitting in my aunt’s garage.
sewing room dresser before

I generally don’t love dressers for sewing room storage – they’re meant to hold clothes, not sewing gear. The drawers are usually too deep, don’t slide easily enough, and the dimensions of the dresser itself is usually all wrong. My dream is to have kitchen-type cabinets of all shallow-ish drawers. (I had something pretty much ideal when I was living at home with my parents, so I’m spoiled!)

But this dresser actually is pretty great. It’s 6 feet long. Yes, 6 feet long. So its proportions are more along the lines of something you’d special order in the kitchen department. And it’s just over 29” tall, which is almost exactly the height of my sewing table – so as an added work surface it’s going to be ideal. The drawers are still a little deeper than I’d like, but they generally slide very well, so I think I can make this piece work.

You can see that the style is such that all the drawers touch. Well, over time, they’ve sort of started to stick to each other, probably from swelling and expanding and whatnot. So I’m getting on sanding and planing down the drawers a bit.

planing and sanding the drawer

I'm using an old planer of my dad’s that I found in the garage. :) Hey it works! I think the blade could use a bit of sharpening, which I’ll get on. I learned all about hand planes from Tommy on Ask This Old House.

planing the drawer

This is my first time using a hand plane, and I’ll admit I’m making a mess of it in some places (from not following Tommy’s advice. Oops!).

Anyway, as I’m working on the dresser, I’m finding it’s made of some nice wood. I thought at first that the finish was that really thick plasticky finish that I’d basically have to paint over. I planned on using Valspar’s Pacific Pleasure (color #5009-10) for the body and keep the top nice and white. Something along the lines of this color:

moisesesquenazi_thumb1
Image from here.

Really gorgeous right?

But like I said, it’s a nice piece of furniture (Thomasville), and I’m finding it’s not hard to sand off the finish down to bare wood. So, then I thought, should I do something like this? And refinish and stain it something gorgeous like Clara’s changing table from Young House Love?

ClarasRoom-After-Changing-T

Thoughts, ideas, questions, comments? I’d love your advice! 

The sewing room is painted a neutral gray, and I’m generally trying to keep all work surfaces white. (Don’t want colors clashing or affecting your judgment while you’re working!)  I do have another desk that is blue and I plan on updating with Valspar’s Pacific Pleasure. 

So do I go with two blue and white dressers to keep things cohesive? Or bring in some nice, neutral wood tones? Opinions? Help!!

Related Posts Plugin for WordPress, Blogger...