Tuesday, February 5, 2013

Window Shopping at HomeGoods

Here is my secret. If you need a ride to or from Midway Airport in Chicago, ask me and I’ll take you. Because I use it as an excuse to go to the nearby HomeGoods without feeling too guilty. :)

I hope you don’t mind taking these cell-phone pictured window shopping trips with me, because here’s another one.

There were these super-cute Anthro-looking ring holders.  My friend, Ashley, has bunnies, and I’m always tempted to get her things like this. :)

IMAG1039

I loved these mother-of-pearl/shiny marble inlaid mirrors.  They could add some fun bling to your house without being over the top.

IMAG1036

I feel like HomeGoods always has great accent chairs if you need one.

IMAG1035

This Cynthia Rowley bathroom stuff was so gorgeous. I just wanted to get some for fun.

IMAG1034

I loved this owl décor – sitting on books! It was a little too big for my mantel, though, so I had to leave it behind.

IMAG1033

I always eye these cute dog food containers, and I did end up buying this blue one, even though it was a little pricy for my taste at $9.99 (for a dog biscuit container that I really don’t need! I always feel better when those kinds of things are on clearance). But it was exactly what I’ve been looking for – non-breakable with an easy-off lid and a nice wide opening for easy grabbing of treats.  I hate to make Grounder wait for his treats.

IMAG1030

I love wandering around HomeGoods, hunting for specific things and generally just browsing for what’s new and beautiful.  So if you need a ride to/from Midway, give me a call. :)

Wednesday, January 30, 2013

Frankfully on Facebook!

Well, it seems I’ve created a Facebook page for my little ol’ blog.

I think it’ll be good for sharing projects in progress and updates that aren’t quite big enough or blog-worthy enough yet (not that I have really high standards for that!) :)

So, come on over to Facebook and “like” me to see updates!

Here are a couple of Frankfully photos/updates from Facebook/Instagram :)

I’m working on some mantel styling…and when I actually have it done/close to done, I plan on posting it here on the blog.  But in the meantime, here’s a sneak preview.

mantel_styling

I’m also obsessed with (and plan on posting about) chalkboard labels and the amazing chalk pen.

sugar_creamer_chalk

So, there! Hop on over to Facebook and like my page! :)

Friday, January 25, 2013

Oh, Dishwasher

Just so you know I haven’t been slacking (I've got a couple of fun little projects to share, I really do!), here is what I did today: I took apart our dishwasher. Of course. Why wouldn’t I?

taking apart the dishwasher

It all started when I thought I’d clean the dishwasher by putting a cup of vinegar in the bottom rack and squirted some liquid Bar Keeper’s Friend into the detergent dispenser (spoiler: it was a bad idea!). I went downstairs to work on a fun little project, and came up to find a leaking dishwasher.

I found the leak right away. It’s underneath the dishwasher; it looks like it’s coming from near the motor/pump.  Before I got Brian to help me take the dishwasher out from under the cabinets, I thought I’d see what I could take apart and clean out on the inside, in case that’s all it was.  Thanks, Google, for giving me various parts lists and manuals!

I did find all sorts of junk down there: what looked like a whole napkin or paper jar label, what looked like the little plastic thing that comes in steak, and something that looked like chipped porcelain.  I am clearly going to be a lot more careful of what goes in the dishwasher from now on!

taking apart the dishwasher

And after, I got everything back together, there’s still a leak. It could just be a coincidence, but one thread online definitely alluded to the abrasives in Bar Keeper’s Friend getting into the seals of the pumps and motor, so that might have been what happened. Womp womp. :( I guess my beloved Bar Keeper’s Friend really isn’t good for everything.

Tomorrow, I think Brian and I will take it out and see if we can figure out what’s going on. I have a feeling it’s either a $20 seal that has to be special ordered, or a whole new motor pump assembly that’s in stock and $120.  I’ll let you know what we end up doing!

PS – I don’t really recommend that you take apart your dishwasher :) but maybe you’re like me and you just want to see what you can do yourself. :)  So, have you taken apart your dishwasher?

Monday, January 21, 2013

Comedians in Cars Getting Coffee

I have been a bit under the weather since this weekend, but I survived thanks to Jerry Seinfeld’s web series, Comedians in Cars Getting Coffee.

Please watch. They are all hilarious and he’s got some really great guys and real stars on there. I was obsessed with Carl Reiner and Mel Brooks. (I’d heard of this web series, but it was brought back to my attention by the lovely Joanna Goddard of Cup of Jo. Also, this article and video about Jerry Seinfeld were fascinating. It’s amazing to see people work at their craft. As a blogger, seamstress, and DIYer, I love seeing how other creative people work on the things they love.)

The second most amazing thing is Plex.  I do not really understand it (my head it still a little too stuffed up to understand anything), but I do know that Brian signed up for an account, and somehow now we can send videos from our smartphones or computer (I have a “Plex it!” button on my browser window now) to our Roku box, thereby allowing us to watch YouTube (or any internet) videos on our TV!  It’s so awesome – it makes a web series like this much more enjoyable. And with all the HD video out now, even YouTube videos look great on TV (which is amazing! Remember the crappy quality of videos on dial-up? If you could even see the video, that is!)

plex-thumb-logo

And lastly, Happy Inauguration Day!  I, of course, love Michelle Obama’s dress. I love most everything she wears. Plus, she’s a great role model for women and girls everywhere!

What have you been watching lately?

Thursday, January 17, 2013

Window Shopping at Marshalls

Taking a spin around Marshalls, TJ Maxx, and HomeGoods has got to be one of my favorite things to do.  You just never know what treasures you’ll find and what great deals there will be!

Sometimes I don’t really find anything that strikes my fancy, and other times, I find a gazillion things. These are some of the fun goodies I found at Marshall’s a few days ago and snapped on my cell phone.

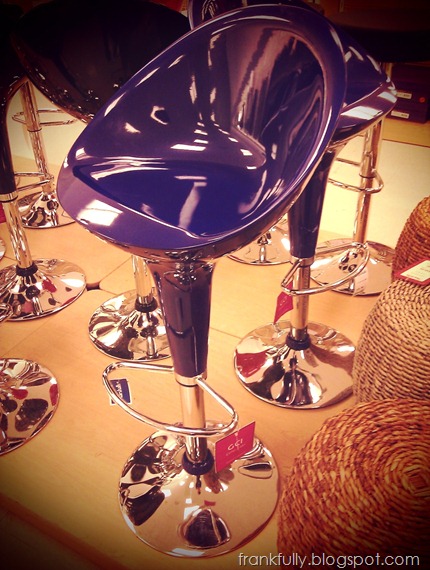
How about these great bar stools? Blue and only $39.99 each! Too bad I don’t have a place for them yet.

blue bar stool at Marshalls

I also seriously loved all this chalkboard artwork.  It was like Pinterest come to life, and the quality was pretty amazing, considering their mass-produced nature.  They really did look unique and individual.

IMAG0921 h

None of the sayings were quite up my alley, though, so I let them stay at Marshalls.

I did really enjoy this “Row Row Row Your Boat” print, though, too. :)

IMAG0922 i

Again, no kids and no boat or ocean theme meant that I had to leave it at the store.

When I started wandering through the decorative aisles, I found all sorts of amazing accessories.

This clock was right up my alley…sort of industrial and vintage looking.

IMG_20130117_121653

I loved this little collection of little globes.

IMG_20130117_122112

And I especially loved this blue artichoke tea light holder. But who needs a tea light when it’s so pretty as is?

IMAG0943 h

I don’t know how or why I was able to leave these things at the store!  (Oh yes, I do. It’s because my Christmas stuff has yet to come down and I don’t want to get accessories like this until I know where I can put them. I guess I’d better do that after I finish writing this post and head back over to Marshalls.) :)

I also found this great metal container. Such beautiful designs. It could make a great planter (with a plastic pot inside?) or just pretty decorative storage.

IMG_20130117_121837

When I headed over to the kitchen/dining aisles, I noticed that they’ve got the containers I used for my DIY lotion back in stock! Great for gifts, right? The small one (that I bought several of) is only $3.99 and the larger one is only $4.99!

IMAG0939 ih

And one of the more drool-worthy finds was this china by Spode. They’re called Isabella and I love them. Luckily (or unluckily) they only had one place setting – so I wasn’t too tempted to buy them (because I do not need any more dishes).  But of course, I looked them up online.

IMG_20130117_121119

I’ll tell you though, if they’re still there next time I do, and if my local TJ Maxx also has some, I will take it as a sign that I need to own them.

Have you found anything great while you’ve been shopping lately? Do you ever have the restraint to leave the goodies at the store?

Friday, January 11, 2013

DIY Pretty Thermostat Cover

So, after all that work putting in a programmable thermostat, here’s how I covered it up. :)

"six impossible things" thermostat cover

It’s on hinges, so you can open it up and get to the thermostat!
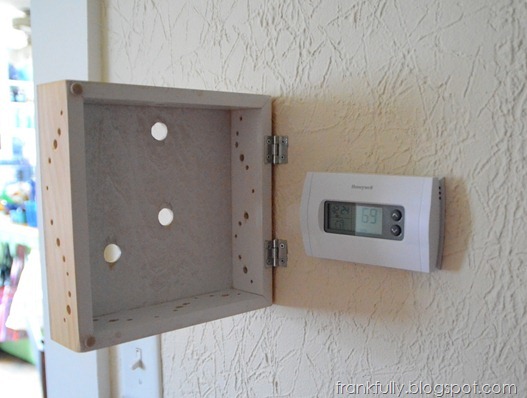
the inside of the cover, hinged to access the thermostat cover

I got the idea from this pin that was for an alarm cover.  I plan on making the hallway where this thermostat is into a gallery of artwork, and this new artistic cover will be the starting point. :) The pin used a canvas to cover an alarm panel, but I knew that the thermostat needed to be able to gauge the room’s air temperature, so I worked on something that I could drill holes into.

I’ve had it installed for about a month now, and so far so good with the thermostat and the furnace trucking along happily.

I was inspired by this paper cut from Etsy that I saw ages and ages ago. “Why, sometimes I’ve believed as many as six impossible things before breakfast,” says the White Queen to Alice, in Through the Looking Glass.

I started by finding this 8”x8” wooden “canvas” at Michael’s.

8x8 wooden "canvas" from Michael's

I printed out the quote several times in several sizes before deciding what I thought would look best size-wise, then taped the paper to the board and used the technique I found from this pin to “trace” the letters on to the board.

"tracing" the letters on to the wood

The pen leaves a light indentation in the wood which you can then follow with paint.

But first, I drilled holes where the ‘o’s would be to allow for airflow to get to the thermostat. I found that a 3/8” drill bit about matched the size of my ‘o’s.
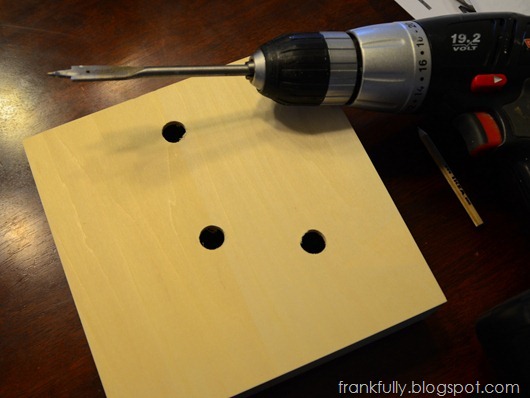
I drilled holes for the 'o's. I used about a 3/8" drill bit

Then I painted the letters.

painting the letters

I started out with white paint because I was so in love with the idea of the inspiration photo. I knew that the holes would be darker, but I just kept thinking how much I like the light look.

I wrapped some sandpaper around a pen to smooth the insides of the holes.
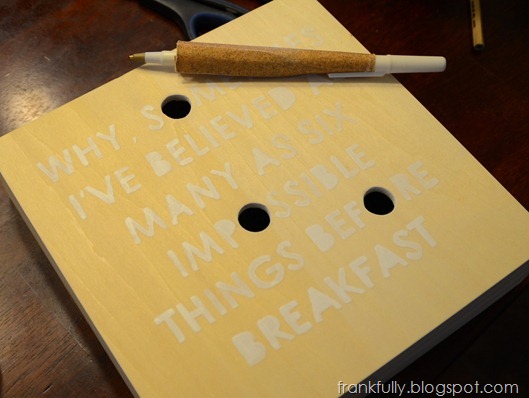
sandpaper wrapped around a pen to sand the inside of the holes

To increase the amount of air that would reach the thermostat, I drilled holes into the sides of the wood canvas. I lightly drew them out with pencil in a wavy pattern and used different sized drill bits to make the whole thing look designed and purposeful, not just that I’m trying to keep the thermostat working. :)

many holes in the side, in a wavy pattern

After sanding the sides, after a few coats of white paint on the lettering, I put about 3 coats of water-based satin clear coat over it for protection.

satin clear coat

I did a very light sanding (with 22o grit paper) in between coats and the results were phenomenal.  The whole piece is super smooth and well-protected, but the satin clear coat is so matte, you can barely tell it’s there. It didn’t change the color of the wood at all.

white lettering and holes

Doesn’t it look so cool?

I wanted to spray pain the inside of the box white, for protection and just in case it helped visibility of the thermostat in any way (white reflects light, right?). So I taped off all the holes (so the spray wouldn’t mist through onto the front) and went to town.

taping up the holes before spray painting the inside

tiny hinges from lowes

I bought these tiny hinges at Lowe’s.  They’re just 1” tall and I made sure they weren’t really wider than the thickness of the wood.

I placed them and pre-drilled holes. If I was fancy, I could have/should have notched the wood out for the hinges so they’d be flush, but I really didn’t want to take time for that step. :)

pre-drilled the holes for the hinges

It took me a minute and some trouble to really mount it level on the wall, and I just sort of trucked along and maybe said some bad words, so I don’t have pictures of that step. I will say I tried to make marks, level it, place one screw, level it, place another and so on. It turned out pretty good. 

the inside of the cover, hinged to access the thermostat cover

My one important tip:  since the screws for the hinges were so so tiny, much too tiny for any kind of wall anchor, I actually put wood glue all over the threads before I screwed them into the drywall, because I didn’t want them to just pull right out. I know we’ll be opening and closing this cover a lot. As we use this guy, I will tell you how the glue in the drywall holds up.

Anyway, after installation, I had this!

I loved the white lettering with the wood and the walls, but the holes didn't look quite how I'd hoped.

I loved the white letters on the light wood with the light wall. But I sort of hated how obvious the holes looked. I totally wanted to set up some tiny LED behind there so that the light would shine through (like above!) but let’s be real, Victoria. That’s ridiculous.

So I just had to re-think it. I decided to repaint the letters in a really dark blue or black. I ended up deciding on a sort of navy color, and the way the lighting is in the hallway, it really does look cool: it’s very dark, you can hardly tell it’s blue, and the holes blend much better.

"six impossible things" thermostat cover

So I actually unscrewed the hinges from the wood side, took it down and repainted it. My painting definitely got a little messier since I was painting 2-3 more coats over the white I already had, but it’s okay to be imperfect. And in the hall where you’re really not staring at it, it looks great.

And I’m really happy to have a new cornerstone for my future gallery wall/hall! Now I just need to start hanging the rest of the pictures!

What do you think? Are you willing to embark on this tedious process to cover up your thermostat? :)

Related Posts Plugin for WordPress, Blogger...