Thursday, December 13, 2012

Things I Love Thursday: Tamron 18-200mm Lens

Here’s a little review of the Tamron 18-200mm lens that I got for my birthday in August.  I’ve had it for a while, and  in case you need a holiday gift idea or a good all-around lens for traveling this holiday season, this might be your answer!

I’ve already told you how much I love my boyfriend of a camera, as well as my 35mm lens, and SB400 flash!

Let me remind you that I  am no pro photographer. I’m just a picture-happy gal who wants to capture everything I see and keep the pictures as memories. That said, I definitely want to tell you how I use and like my gear because I know that a lot of you are in my boat, and when I'm shopping, I want this kind of review.  It's not techy or geeky or heavy on specs, just how I use it.

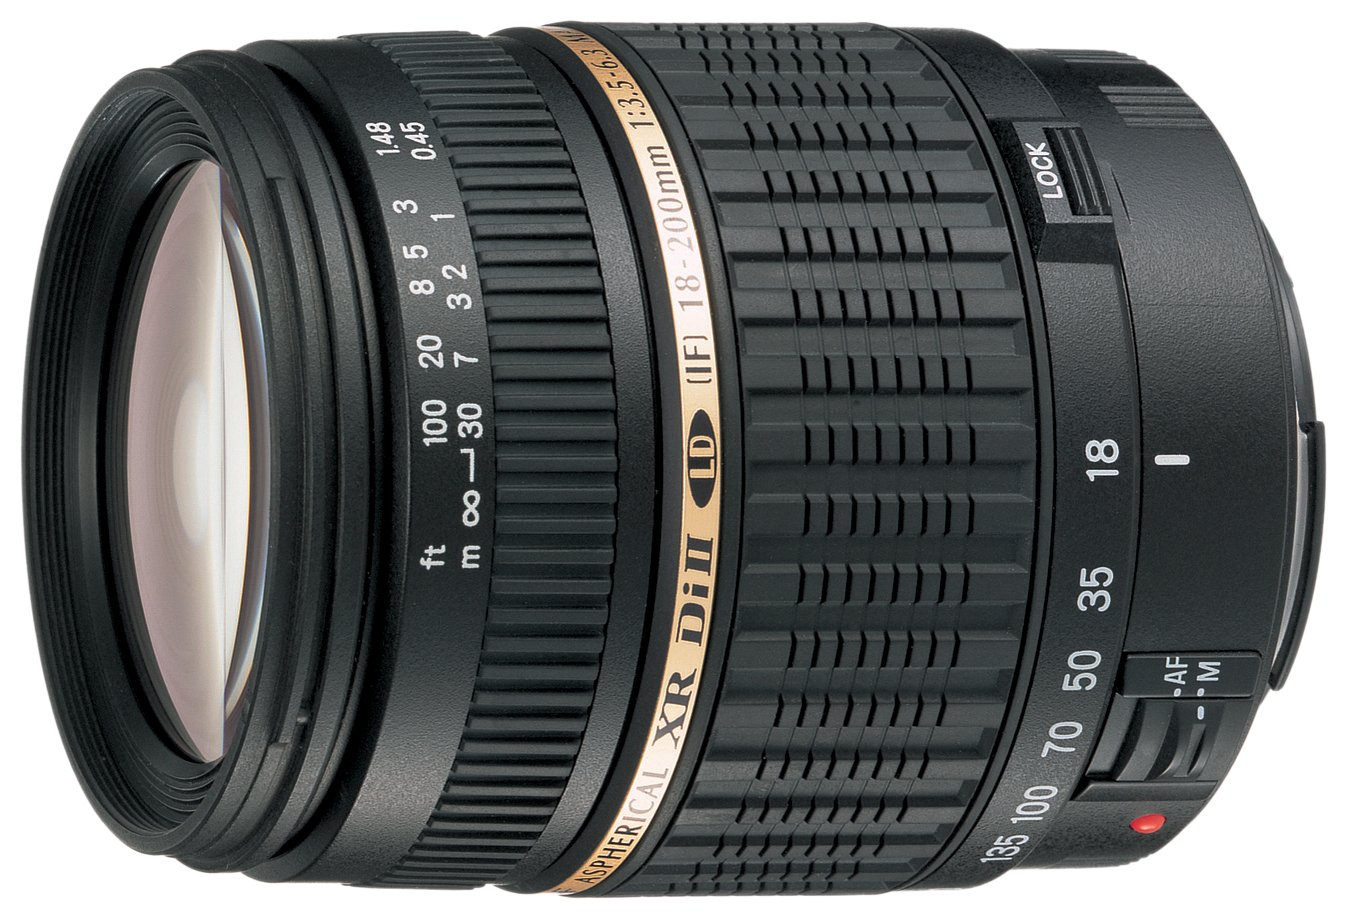
So, the Tamron 18-200.  I am so happy I got this lens as an all purpose/travel lens.  I really do have it on my camera 80% of the time now. (I put the 18-55mm Nikon lens that came with my camera into my camera basket on the living room bookshelves.) The Tamron 18-200mm zooms out to the 18mm wide angle so I can take pictures of rooms and large groups of people and it also has the ability to zoom in and frame shots or take nice close up shots of things across the street.  Traveling in Boston with it was amazing. I felt like I never missed a good shot (and was able to put together an awesome photobook of memories with it!)

Green Dragon Tavern

I chose the Tamron version of this lens over the Nikon version based on weight but mostly price. (Really, mostly price!)  As far as techy/geeky things go, I was a little worried about the lack of VR (vibration-reduction, for when you’re zoomed out all the way to 200mm, a feature that’s on the Nikon but not the Tamron), but so far that hasn't been a huge issue for me.  It's definitely heavier (just read the specs) than my kit 18-55 or my trusty 35mm...in fact, when my mom is using my camera with this lens attached and the SB-400, she gets tired of holding it.  (Remember, I don't, that's just my mom who's used to a point and shoot, but still good for you to know!)  To me, though, the extra weight is worth the amazing versatility. (And when traveling, I don’t normally have my external flash attached.)  Another techy/geeky note, in some reviews comparing the Tamron version to the Nikon version, people talked about sharpness, distortion, etc, of the lens (I say “etc” because my eyes began to glaze over), but I haven’t noticed. Maybe pro or art photographers would, but for my snapshots, I couldn’t be happier with the Tamron!

my Nikon D5100 with Tamron 18-200mm lens, 77mm step up ring, and SB400 flash
My Nikon D5100 with Tamron 18-200mm lens, 77mm step up ring, and SB400 flash

This Tamron lens uses 62mm filters, so I did get a nice clear filter to leave attached all the time to protect the lens.  For other filters, though, I did get a 77mm step up ring that I am leaving attached all the time.  I don't always use a lot of filters, but I like to be prepared when I do.  I’ll sometimes use a star filter, warming filter, or polarizing filter, and since my other lenses are 52mm, I was going to have to buy a new set anyway. Well, I would hate to buy a set of 62mm, then need another size in case I do get other lenses later. 77mm seems to be the biggest, non-commercial lens size you can buy, so I’ll be getting step up rings for any future lenses to accommodate 77mm filters.

The lens does creep (zoom out as you’re walking) :) so I use the lock – which is why they put it on there!  The Nikon version may be a "better" lens, but for my picture taking, I couldn't be happier with this lens, especially for the price.  After getting this lens, (along with the things already in my camera bag), I haven't been craving a lot of gear like I was before.  (Though, there are a few things on my Christmas list, like colored gels for my flash and a wired remote, hint hint.) :)

What about you? Do you have a lens like this and like it? Did this rambling review help you choose a lens? Is there another lens that you have and love that I need? :)

Friday, December 7, 2012

Mozzarella and Basil Stuffed Chicken

Thanks to my amazing Aerogarden, I’m always looking for delicious things to cook with all my basil. Well, this dish was very delicious! Chicken tenderloins stuffed with garlic, mozzarella, and basil in a creamy mushroom sauce or garlicky red sauce. Yum.

mozzarella and basil stuffed chicken with mushroom sauce

mozzarella and basil stuffed chicken with red sauce

Oh my gosh, my mouth is watering writing this post.  This was the kind of dish where the chicken was good on its own and the sauce was good on its own, but together, oh man. Oh man.  Together, it was just so good.

I basically followed this recipe from SouthernFood.About.com but I changed it up a tiny bit, using chicken tenderloins for little roll-ups instead of full chicken breasts, just because that’s what I had on hand, because I like cooking with chicken tenderloins for some reason.

So here’s what I did.  (I’m not going to re-write the recipe for you, but I’ll show you what I did and what I changed!)

I set the oven to preheat at 375 degrees, and I got to work pounding the chicken. A meat mallet would have worked better than my rolling pin, but either I don’t have one or I don’t know where mine is.

pound (roll) out the chicken

Chop up some basil and sauté some minced garlic in butter, then put that deliciousness together.

basil and garlic

Then I got my little stuffing station together: the basil/garlic mix, some shredded mozzarella, and some bread crumbs. (I skipped the egg wash part. Eh, it just seemed like an extra step that I didn’t need to take.)

breadcrumbs, mozzarella, basil/garlic, and chicken ready to go

I spread on some of the basil/garlic, sprinkled the mozz on, added some salt and pepper, then rolled/folded the chicken tenderloin into thirds. Then I dipped the little roll into the bread crumbs (and made sure to coat it all over!) and…

spread the basil/garlic then sprinkle with mozzarella

…placed them on a parchment paper-lined baking sheet.

roll them up and dip the chicken in bread crumbs

I sprinkled some extra mozz and breadcrumbs on top. :)  Then they went in the oven to bake for about 30 minutes (but definitely check your time. I was not scientific about it, so I can’t remember how long they really were in there.)

While they were baking, I worked on making two different sauces! A creamy mushroom sauce for me (from the recipe) and a red sauce for Brandon.

two sauces at once

I followed the mushroom sauce recipe pretty closely, but I left out the green onions (just because I didn’t have any), I used half and half instead of cream (again, just what’s in the house), and a bullion cube to make my own “broth.” Let me tell you, that mushroom sauce was ah.may.zing.  Seriously so good. I could just eat it on its own. Really, what’s the difference between creamy mushroom sauce and creamy mushroom soup? Not much, I think.

The red sauce I make is pretty easy and delicious. I put about 2-3 tablespoons of olive oil in a pan and let it warm up, then I add a teaspoon or so of minced garlic.  I let that warm up a bit, then add a can of tomatoes, diced or crushed, or sauce or whatever you’ve got. And I let it cook/simmer for a while to take out the acidic tomato taste and let it taste like garlic. While it’s cooking (probably about halfway through), I add the chopped fresh basil. Along the way, I’ll add salt, pepper, and a little sugar to taste.  Oh. My. Yum.  I’ll try to take some better measurements as I’m cooking it next time, but it’s one of those things I eyeball as I go. But it is so simple and delicious!  And since Brandon prefers red sauce to cream sauce, I’m glad to have an easy, go-to recipe for it.

Let’s just look at the mushroom-sauce picture one more time to make us hungry.

mozzarella and basil stuffed chicken with mushroom sauce

Yum!!!  Again, here’s the recipe I followed.

Are you cooking tonight? :)

Thursday, December 6, 2012

Maligayang Pasko

I am so proud of myself for actually seeing a project through, start to finish, in a day. :)

Maligayang Pasko

“Maligayang Pasko” is how you say “Merry Christmas” in the Philippines!

When I saw these posts on House of Hepworths, I was totally inspired. I knew I could do something similar for Christmas.


First, I went to my Gypsy (for Cricut) and designed a “Maligayang Pasko” using mostly the Calligraphy Collection font but a little of Gypsy Font. (The “li” were in the Gypsy font, just so I could get the cursive layout how I wanted it.)

Maligayang Pasko on the Gypsy for Cricut

Since we’ve taken our fence down, we’ve got this pile of fence panels in the back yard. So I figured they would be perfect for this project.

taking boards off a fence panel

I set my Gypsy/Cricut design for the largest cutting mat, 12”x24”, so I knew I wanted my sign to be bigger than that. I measured the boards of the fence panel and decided I needed about 9 (which was about 32”), so I took about 11 off the panel (just to be safe since some were cracking).  (I decided to make two signs, one for myself and one for someone special who has to wait till Christmas to get it!)

cutting the boards, attaching them back together

I decided to use the greenish, weathered sign, since it looked like it could be festive. :)

I cut each one of my boards to about 19.5” (a random measurement that looked good to me!).  I cheated by just cutting the boards around the sections with the nails in them (that were previously holding the fence together). (The nail-y scrap pieces went straight into the garbage/burn pile.) 

I found another scrap board in the back yard that I to cut to the width of my sign as a backer for all the fence pieces. I used 5/8” 18ga nails in the nail gun to attach the planks to the back boards. (I should have also used some glue. Oh well.) I put those little nails in the front and back of the wooden sign.  Once it was all together, I gave everything a quick sanding with some old 100 grit paper.

Then I collected some paint and stuff.

paint and spray glue

I cut the first “Maligayang Pasko” (on the Cricut) out of freezer paper (shiny side down). (I think posterboard or something would have been ideal, but I didn’t have a piece around that was big enough or a new cutting mat that was sticky enough.)  I sprayed some adhesive on the back of the cutout, then placed it onto my first set of boards. It was really sticky, which was good for my rough boards.  Then I sprayed the whole thing with several light coats of red spray paint.

Maligayang Pasko reverse stencil

When I peeled off the stencil, I was so happy with the results!

Maligayang Pasko sign in progress

But, as cool as this green looks in the picture, in real life, it wasn’t quite what I wanted yet, so I decided to brighten up the lettering with some white paint. I took a small artists brush and some oil-based white paint diluted with mineral spirits (so it would be a little thinner and slightly runny) to keep everything looking weathered and rustic. (Latex paint probably wouldn’t have stuck to the spray paint/rough boards as well.)

painting in the letters of the sign

For fun and added interest, I splattered a bit of white paint around, and spread some white paint on the edges with a  bunched up paper towel.

Maligayang Pasko

I was finally in love with the sign. I added to the weathered old look by running the sander with some old 100 grit paper lightly over the whole thing. Then I sprayed it all with some clear coat to seal everything in.  Doesn’t it look great?

Here it is again on the mantel!

DSC_0663-002

I made two signs, start to finish, in a day, and both were done completely with stuff I already had around the house. Woohoo for a completed and free project!

What do you think? Will you be trying a decorative sign made of old boards? :)

Wednesday, December 5, 2012

Christmas Mantel

I haven’t done too much holiday decorating, but after our stint downtown Chicago, I was totally inspired to start. I even made a Christmas craft!

Here’s my Christmas mantel!

Christmas mantel

I made the “Maligayang Pasko” sign/décor the other night, and tomorrow I’ll show you how I did it!

Maligayang Pasko

“Maligayang Pasko” is how you say “Merry Christmas” in the Philippines!

I’ve got a very multicultural mantel (well, at least two cultures). :) Next to my Maligayang Pasko sign are two Swedish Santas that I embroidered and sewed together a few years ago.

Swedish Santas

They’re from a Husqvarna Viking embroidery disk.

I made a spot for Katie Daisy’sPeace on Earth” print (next to some Barbie ornaments).

Peace on Earth by Katie Daisy

And no mantel would be complete without stockings, in our case a hodge-podge of 99-cent clearance stockings from Old Navy, which I embroidered with our names, and some removable-picture pet stockings that will hopefully last for many pets. :)

stockings

Before all this, I had just begun playing around, styling the mantel with my Spring in the Dunes print.  I was using various empty frames (well, filled with whatever the store had in them) and objects for height and scale.

trying out some mantel styling

But I’m pretty happy to leave that project until after the new year and enjoy this for now.

Christmas mantel

Now onto cleaning and decorating the rest of the house!

Tuesday, December 4, 2012

Aerogardens on Sale!

So, I should have posted this sooner, but they keep threatening to end the sale, so I didn’t. (Of course, now that I’m actually posting this, the sale might be actually over tomorrow.)  Aerogardens are on sale!

For the past few weeks, Aerogarden’s been having some good sales, (Cyber Week, baby!)but in my opinion, the best one is the Aerogarden 3, like I have, for $49.95.  Trust me, that is the best price all year.  I know.  I’ve been shopping for them all year. :) You won’t find one cheaper!

Aerogarden

If you’ve been following along, you’ll know that I love mine! I love watching it grow, and I love having fresh herbs for cooking. (In fact, I’ve got a stuffed chicken post that I should really write up for you! Yum.)

If you’ve been thinking about getting yourself one, now’s the time! (If I didn’t jinx the sale by posting this, that is.)  :)

Happy shopping!

(Update: today, Dec 5, the black Aerogarden 3 is still $49.95 but the others are $59.95, BUT they’re offering free shipping! Go shop!) :)

Monday, December 3, 2012

Ideal Bookshelf Book and House of Hepworths

So, I’ve been telling you how I’ve bought (and been in love with) some of Jane Mount’sIdeal Bookshelf” prints on 20x200.

I just found out (via Cup of Jo) that she’s illustrated a whole book of ideal bookshelves! My Ideal Bookshelf is totally going on my Christmas wishlist!

Head over to Cup of Jo for some more pictures from inside the book!

………………..

And here’s a new blog I’ve been reading: House of Hepworths.

I can’t remember how I found it…it was either Pinterest or Young House Love. :)

She’s got lots of great ideas, including this “fake pinch pleat” which I totally plan on using when I finally get to making my living room curtains.

Thomas_Paul_Fabric_curtain_rod_31

I’m also in the process of making some Christmas artwork inspired by this post.

And this post.

Awesome_Silhouette_art_HoH_44

Head over there and check it out!

Sunday, December 2, 2012

December

The holiday season always sneaks up on me. Even though I’ve been busily buying Christmas presents since Thanksgiving, I haven’t been quite in the spirit to start decorating my house (I still have pumpkins on the front porch!).  I mean, how is it December already?

It was 60 degrees out yesterday (and today), so I did put up decorations and lights on the outside of our house, because I knew I’d never get a better time.  But figuring out numbers and lengths of extension cords doesn’t exactly get you in the Christmas spirit.

Then last night, we ventured to downtown Chicago with friends (since it was so warm) and really kicked off our holiday season. :)

We stopped first at Daley Plaza for Christkindlmarket.

at Christkindlmarket in Daley Plaza, Chicago

I was in love with these colorful lighted stars. I know we’ve all seen them before, but how pretty do they glow? What if these were your only holiday decorations? Gorgeous.

colorful stars at Christkindlmarket, Chicago

Then we headed over to Michigan Avenue to see the trees and eat a delicious late dinner.

lights on Michigan Avenue

It’s all enough to get anyone excited for the holidays, right?

I feel like I’m ready to start my decorating! I’ve been pinning a lot of ideas, so I think it’s time to actually bring of them to fruition.

Where are you with your holiday decorating? Have you started? Are you done? Can you believe it’s December??

Related Posts Plugin for WordPress, Blogger...