Showing posts with label kitchen. Show all posts

Saturday, October 17, 2015

Our House is on the Market!

So I didn’t really get to talk about this yet, so here it is.

We love our house so much. We love its location – great street, great yard, great area, close to stores, etc etc. We love the house…after all, we’ve been customizing it to our tastes for 6 years now! I love its solitude. :)

But things change, as always. My parents built a great house when I was finishing college, also in a great area, and on a piece of property that’s been in my family for 75 years. (Isn’t that cool? That doesn’t happen a lot nowadays.) My mom doesn’t want to live in that house by herself any more. At first, we thought we’d build her an in-law suite at our house, but when we looked at the costs and amount of work, we started to realize that making some changes at her house would make more sense, and we’d move in there.

It’s going to be crazy. Mom: you and I better get along! But it will be great for her to be near Porcupine. And that house has a lot of great positives, too. A different kind of great location – very kid friendly. It’s a much newer house, so is better insulated, more efficient, etc. We’ll still be doing remodeling projects to fit our new family and lots of fun redecorating! And I get to design and build a whole new sewing room…mmmmmm…I’m sooooo excited!

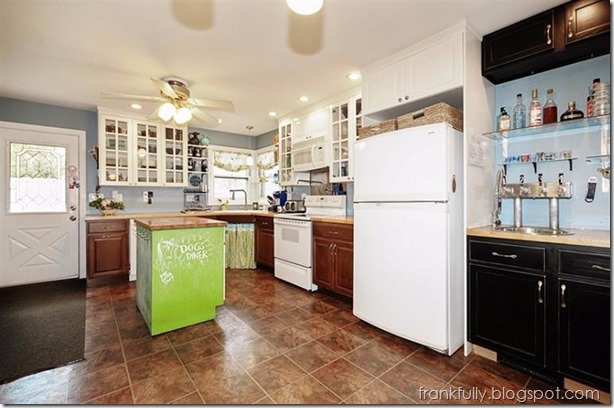
For now, here are the cool pro-photos of our house that accompany its online listing. (I will update our “house tour” with pictures I take myself!)

 front living 1 living 2 living_kit living_kit 2 kitchen bedroom bathroom 1 bathroom 2 nursery

Don’t you want to buy my house? ;)                  

Thursday, March 28, 2013

We finally fixed the dishwasher!

So, about 2 months after I initially broke our dishwasher, we finally got around to fixing it.

Just for reference, we have a Whirlpool dishwasher (model #DU1345XTVQ0) and I love it.  I just put some Bar Keeper’s Friend in there and broke it.  There was a slow, dripping leak coming from the motor area. (And it turns out, somebody (coughcoughBrian) often leaves napkins on his plates when he’s putting them in the dishwasher and those napkins weren’t helping either.) 

We ended up installing a new motor.  Thanks to the Internet, I found a motor at our local appliance parts store, Bell Parts, (you can also order online!), and some instructions on how to do it.  The instructions weren’t for our dishwasher exactly, but they were close enough that we were able to uninstall and re-install everything we needed to!  (It was also helpful to have our dishwasher’s manual and parts list in front of us, too!)

Again…I do not recommend that you do the crazy things we do (like take apart and fix your own dishwasher)…but for us, it was better than buying a new one! It might be for you, too!

fixing the dishwasher

So, I thought we’d have to take out the whole dishwasher, but we didn’t.  We could unplug and remove most things from underneath.  It was a little tight, and Brian and I took turns working down there. 

Eventually, we got the sump and motor out of there.

dishwasher sump and motor

Here’s the floor showing through the hole when we got everything out.

dishwasher...with most of its insides removed

Once we had the sump and motor out, we took off the old motor.  (It was so easy compared to getting all the stuff out from underneath the dishwasher!)  We did find some nasty gunk (Bar Keeper’s Friend + napkins?!)  on some screens in there.  I don’t know if that gunk was contributing to the leaking, but I cleaned it all anyway, to be safe.

dirty screen from inside there!

Easy peasy was installing the new motor.

putting on the new motor

And then it was just a matter of putting it all back together.  Somewhere in the un-installing process, Brian got all kinds of cuts on his hands and he’s not sure how.  In the whole fixing process, we only got on each others nerves once and had to take a dinner break. Not bad. :)

Once it was all back together and running, it was soooooo great to see a dry floor underneath the motor! No leaks!

no leaks!

And now I have my dishwasher back.  I actually haven’t had a dishwasher for that long in my life…but it’s amazing how quickly I got addicted to it.  I mean, you put your dirty dishes in this magical machine and press a button…and pouf! They come out clean and dry! It really is like magic. :)

Have you lost anything lately, no matter how small, that you normally take for granted? :) Did you get it back? And are you as happy about it as I am? :)

Thursday, February 14, 2013

Things I Love Thursday: Chalk Pens

So I’m a little late to the chalk pen game. 

Now that I think about it, I must have seen the results of this amazing product everywhere, but just wasn’t thinking about it, or realizing just how glorious it must be. 

Chalk Ink from Amazon

I love chalkboard stuff: paint, labels, you name it, but the chalk, of course, is messy. (There used to be a nice layer of yellow dust under my island where the dogs eat.)  Then I saw this post on Evolution of Style, and when I asked Jenny what she was using to write on her chalkboard labels, she said “chalk pen”!  I was excited.

She got hers at Hobby Lobby, I got mine on Amazon.  And ever since, I have been one happy gal. The chalk pen is inky and wet-erase, so it goes on like a paint marker and doesn’t wipe off as easily as chalk. And your writing is much neater and cleaner.

I shared a little sneak peek of the cute jars my friend Janis got me from Anthropologie: they are much cuter and more practical when written on with a chalk pen.

jars from Anthropologie written in chalk pen

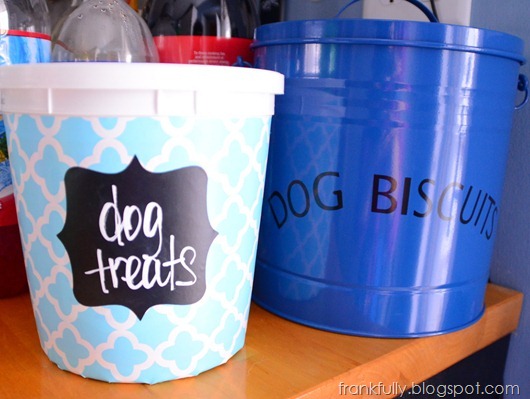
I covered an old Nestle Toll House container (the big one from Costco) with some Contact paper (from Marshalls), cut a Contact paper chalkboard label out on my Cricut, and labeled it with the chalk pen.  Voila, dog treat container!

dog treat containers! one with chalkboard label, one from HomeGoods

You know I love dry erase things, and for some things I still do love dry erase, but in the instance of these jars I have, my labels were just getting erased. The one on the right used to say “raw sugar” and the on the left used to say “hot chocolate” (that label was completely gone!).

jars with erased dry-erase labels

But now, with chalkboard Contact paper and chalk pen, I’ve got this!

blue kitchen jars with chalkboard labels

(The dark blue canisters above still have dry erase labels that have remained in tact!)

And my island! I still have regular old chalk around for when kids (or adults!) come over because it is totally fun to write on the island and erase and start over…but in the meantime, I’ve semi-immortalized (what would that really be? just “extended the life of”?) this cool horse drawing that a friend’s daughter drew and neatened up my “dog’s diner” with the chalk pen! Doesn’t it look nice?

chalkboard island written with chalk pen

I don’t know how those dogs are so messy when they eat/drink, but chalk on that side never lasted! But chalk pen is so far holding up great!

So tell me the truth, am I really the last person to have heard about chalk pens? Are you as excited as I was when I found out? Are you going to go buy one right now? :)

Friday, February 8, 2013

Our Hole in the Floor

This is not going to be an exciting post, but it’s exciting to me.

So, I just posted about how we created a nice, larger opening in between our kitchen and living room. Unfortunately, a result of that was a cold air return stuck in the middle of our floor.

opening from living room to kitchen

See that nice ol’ hole in the floor right in the walkway?

I tried a few different register covers on it, but all of them presented a tripping hazard in one way or another. They bent when you walked on them, or you stubbed your toe ‘cause they stood up too high.  I mean, it wasn’t surprising since most register covers are made to be out of the way, not right in the middle of where you walk.

Most of the time, Brian and I were completely fine walking around the hole, but the real problem came when we had family over or parties.  First of all, people don’t expect to find a hole in your floor,  and secondly, when there are a lot of people around, it’s just much harder to avoid said hole.

So after about 3 years, we finally fixed it.  We moved the cold air return to over by the bar (it took some time for Grandpa and me to figure out a convenient place to relocate it – but with lots of coffee and several trips to the basement, we worked it out) so that we were able to just cover up the hole with some leftover hardwood that I pre-finished with Waterlox to make our job easier.

DSC_0847

No more hole!

Isn’t that the least exciting picture ever?  But I love to walk across it. For fun. Because I can.

Even though I prefinished the hardwood, there were some installation issues (that’s the nice way of putting it) resulting in the need to touch up the finish.  To keep the dogs and cat (and us) from walking over my wet finish, I created a little Stonehenge of paint cans to protect the area. We lived like this for days. It was silly.)

DSC_0829

Have you done any little, boring projects lately that have made a big difference to you? Even if no one else notices, your heart still sings, right? :)

Thursday, February 7, 2013

The Opening

In my attempts to create my house tour, let me go back and tell you about some of the things we’ve already done to the house.

Less than 24 hours after we got the keys to our house, we began knocking out the wall between the kitchen and living room.

It started out like this, with a regular sized doorway between the two rooms.

our kitchen at the home inspection
(This picture was from the home inspection.)

To make the house feel more open, we decided to enlarge that opening to be 8’ wide.

Now it looks like this:

the opening into the living room
(These pictures are a tad bit old, but you get the idea.)

opening from living room to kitchen

(See that hole in the floor? That’s where a cold air return used to be in the wall, and was therefore in our floor. I will post about fixing that later!)

It was our absolute first project when we bought the house. Brian got started right away.

Brandon's first blow into the wall
(Don’t you love the lawn chair décor?)

You see a lot of sledge-hammer-full demos on TV, but in reality, demolition is so messy that you try to keep things as neat as possible. So we used a variety of saws to cut the drywall out in throw-away sized pieces.

demo: cutting out the drywall

We were doing a lot of work, so I didn’t get a lot of pictures, but once we got the wall down, Brian put up some new jack and king studs and a nice, new 2x10 header.

our new opening!

As messy as everything was, it was so nice to feel the new openness.

We got to fixing the drywall right away. Working on this house was like Grandpa’s and my full time job.

drywalling the opening

Clearly at this point, we had a long way to go, but eventually, we got this.

our opening from the kitchen to the living room

What a difference! I can’t even imagine our house without our great big opening, and you know, I even talk about making it bigger and more open!

Have you had any single changes that made your house feel so different?

Friday, January 25, 2013

Oh, Dishwasher

Just so you know I haven’t been slacking (I've got a couple of fun little projects to share, I really do!), here is what I did today: I took apart our dishwasher. Of course. Why wouldn’t I?

taking apart the dishwasher

It all started when I thought I’d clean the dishwasher by putting a cup of vinegar in the bottom rack and squirted some liquid Bar Keeper’s Friend into the detergent dispenser (spoiler: it was a bad idea!). I went downstairs to work on a fun little project, and came up to find a leaking dishwasher.

I found the leak right away. It’s underneath the dishwasher; it looks like it’s coming from near the motor/pump.  Before I got Brian to help me take the dishwasher out from under the cabinets, I thought I’d see what I could take apart and clean out on the inside, in case that’s all it was.  Thanks, Google, for giving me various parts lists and manuals!

I did find all sorts of junk down there: what looked like a whole napkin or paper jar label, what looked like the little plastic thing that comes in steak, and something that looked like chipped porcelain.  I am clearly going to be a lot more careful of what goes in the dishwasher from now on!

taking apart the dishwasher

And after, I got everything back together, there’s still a leak. It could just be a coincidence, but one thread online definitely alluded to the abrasives in Bar Keeper’s Friend getting into the seals of the pumps and motor, so that might have been what happened. Womp womp. :( I guess my beloved Bar Keeper’s Friend really isn’t good for everything.

Tomorrow, I think Brian and I will take it out and see if we can figure out what’s going on. I have a feeling it’s either a $20 seal that has to be special ordered, or a whole new motor pump assembly that’s in stock and $120.  I’ll let you know what we end up doing!

PS – I don’t really recommend that you take apart your dishwasher :) but maybe you’re like me and you just want to see what you can do yourself. :)  So, have you taken apart your dishwasher?

Thursday, August 2, 2012

Things I Love Thursday: Cute Dry Erase Boards!

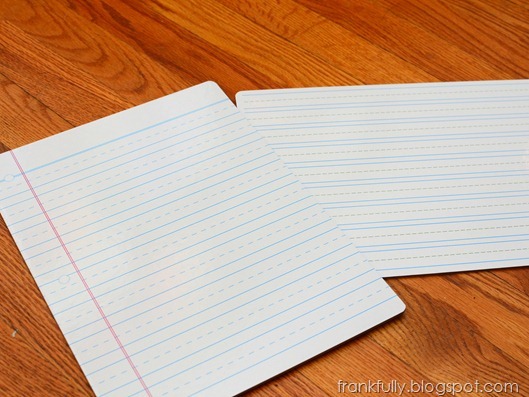
I was doing errands at Target the other day when I saw these cute dry erase boards in the $1 bins.

$1 dry erase boards at Target

I love that they look like paper! They’re supposed to be for kids to practice their handwriting, but I think they’ll be so cute for lists all over the house! For $1 each. You can’t beat that.

I love that these dry erase boards look like paper!

For grocery lists:

dry erase board for grocery list

For to-do lists:

dry erase board for to-do list

I really bought quite a few ;) and I will be putting them in various places all over the house. :)

And then, I was so inspired by cute dry erase boards to keep things organized, that I took the photo dividers that always come in photo storage boxes, laminated them, and put them in my pantry to label what’s supposed to be behind each door.

making dry erase labels

No excuses for not putting things away in their proper places :)

list in the pantry

An organized pantry makes for a happy lady.

list in the pantry

Kind of cute, right?

So, go to Target and get some cute paper-like dry erase boards!

Tuesday, July 17, 2012

Guest Post: Fool-Your-Friends Fake Granite Countertops for $150

I’m pretty excited to present my first guest post!

This is what my awesome friend Ashley’s kitchen looks like now:

Ashley's new kitchen

Isn’t it phenomenal? And the only new things she bought were the floors, which she had professionally done, and the tile backsplash, which she and her husband installed themselves.  The rest was total DIY.  She refinished her cabinets, painted her countertops, and of course, repainted the walls.

She’s been nice enough to share with us her faux-finishing technique for her counters. How awesome to paint your counters!

Here’s Ashley’s guest post:


Fool-Your-Friends Fake Granite Countertops for $150

For me, summertime is home improvement season. Every year I am excited to start
a new project. About halfway through, I hate myself for starting a new project, but at
the end, I’m always glad I did it!

We bought our house in May of 2009. It was in great shape, but we wanted to put
our own touches on it. We did the usual quick fixes, like new carpets and paint. We
knew we wanted to tackle a couple of big projects, like the kitchen, but we put it off
for a couple years. Our kitchen looked like this when we moved in:
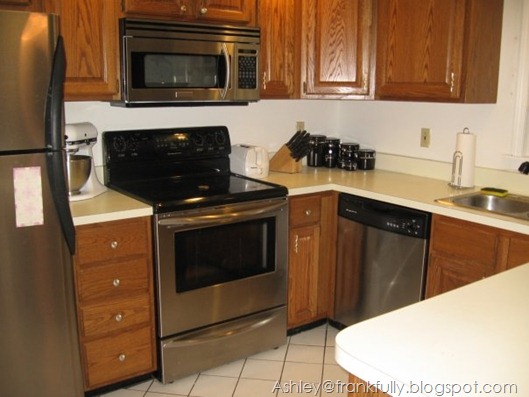
Ashley's old kitchen

And this is what our attached dining area looked like:

Ashley's old dining

We were lucky enough to already have the expensive stuff, like stainless steel
appliances and cabinets that were in really good shape.

I’m a teacher, and a couple months later when I was having trouble finding a
summer job, I took on cabinet refinishing. I hand sanded and used gel stain and
polyurethane to refinish our cabinets, and then our kitchen looked like this:

Ashley's cabinets refinished

The next thing we did was to put in Pergo laminate floors. We liked the ceramic tiles
that were already there, but they were installed incorrectly, and many of them were
already cracked, with more threatening to crack at any time. We didn’t want to mess
with heavy appliances, so we paid someone to install our new floors.

This summer, I needed a new project.

Our white laminate countertops looked cheap next to our fabulous cabinets, so we
looked into replacing them. All of the estimates we got were outrageous, so I started
looking into other options.

I saw some guides to spray painting countertops, but those all looked like regular
laminate, and we wanted something a little fancier. I also found that Rust-Oleum
makes a countertop refinishing kit, but they didn’t offer the color we wanted.

I found this guide online, which wasn’t super specific, but gave me enough details to
get me started. Once I found out you could fake granite countertops, I had my mind
set on it!

It wasn’t a moment too soon, either, because my husband sat a hot pot on a pot
holder and burned a potholder shape into our counter.

Ashley's potholder burn

Of course it was in a place where I couldn’t easily cover it…So I got started!

First, I removed the sink (thank God for YouTube tutorials!!), cleaned and sanded
down the counters, then I masking-taped the edges.

Ashley's counters taped

I gathered my materials:

Ashley's materials

I bought Kilz Primer and Valspar paints. I overestimated the amount I needed. I
could have gone with a small can of the base color, and samples of the other three.
I decided on Glaze Coat because it is waterproof and heat-resistant, which seemed
perfect for a kitchen counter!

I rolled on the primer, and then rolled on the base coat with a foam roller. It looks
green in the photos, but it’s actually a shade of brown.

Ashley's base layer of paint

While I waited for the base coat to dry, I practiced on an old cardboard box to get a
feel for the amount of sponging I should do. This also helped me see the shape of the
sponge, so I could anticipate any recurring shape patterns made by the sponge, in
order to plan and make them less obvious.

Ashley's practice paint technique

I used a natural sea sponge. I cut it in two so I only had to buy one. I found that it
was good to layer the colors – I did a layer of the darkest brown, then a sparse layer
of an almond color. Then I went back over with each layer twice. This really helped
give it a more natural, in-depth look so the layers weren’t obvious.

As a final touch, I used white as a small accent. I had a small paintbrush (like what
we used in art class in elementary school) and used that to flick paint onto the
counter. A toothbrush would probably work too! I occasionally used the paintbrush
like I used the sponge, and just made a splotch on the countertop. Because I had done a practice run, I had a good idea of how dense to make my layers each time,
since I would be going over them again and again.

Here is the painted countertop!
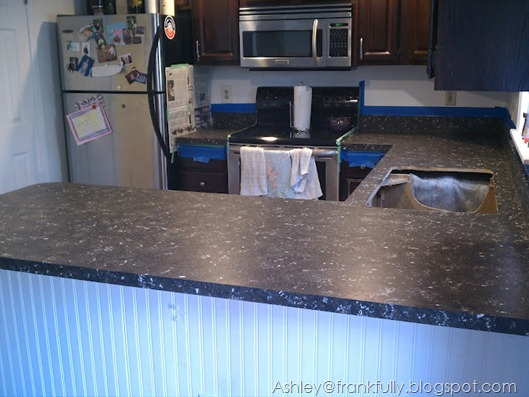
Ashley's granite paint technique done

The next step was the scariest for me – putting the glaze on! It’s basically a two-part
epoxy with a time limit for applying it. Before I got the glaze out, I taped everything
off. I used several layers of newspaper on the floor for drips. It was mostly ok, but it
would have been better to use a plastic dropcloth, or maybe even just trash bags.
The epoxy soaked through to the floor in a couple of places. (It mostly scraped off
though – I was lucky!)

I also made the mistake of not moving the stove out for the first coat! I ended
up epoxying the stove to the counter top. We had to use a putty knife to cut it
loose…oops! My final mistake to learn from is to turn the air conditioning off,
no matter what kind of insane heat wave you are having! Not only is it good for
ventilation, but it also keeps tiny dust particles from blowing up and landing in your
glaze coat.

I followed the Glaze Coat directions exactly, and it turned out pretty well. I used a
foam brush to spread it on to the vertical surfaces, which works, but it is important
not to get too much on, or there will be drip marks, which are really noticeable with
Glaze Coat.

On my first coat, I had some trouble getting the glaze to spread all the way to the
edges. During my second coat, I came up with this brilliant idea!

Ashley's glaze coat with tape walls

I used the masking tape to build a wall (make sure it’s on there with no ripples for
the epoxy to drip through!). Then I was free to pour out the glaze all the way to the
edges. I used a straight trowel to spread it evenly. Watch out for dry spots! I had
some spots that the glaze just skipped over for some reason. You have to catch these
spots and respread them before the glaze dries, or you’ll have to do a second coat
like I did. Having to do a second coat was not only more expensive, but way more
stressful too! In the picture above, you can see the midnight slushie my husband and
I had to go get in order to escape our ripped-apart kitchen!
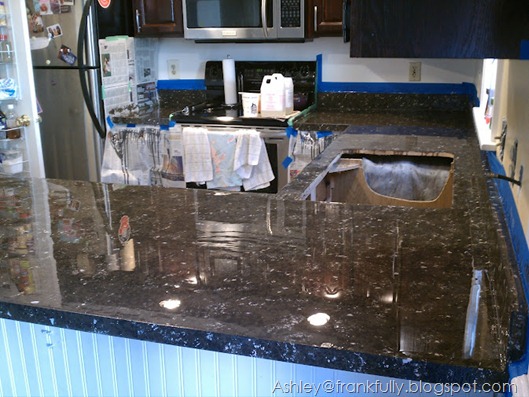
Ashley's glaze coat drying

After about an hour of drying time, I was able to pull the masking tape off the sides
and it was stable enough that it didn’t drip or droop over the sides.
Then the glaze has to dry for 72 hours. It will be dry to the touch after the first 24
hours, but don’t put anything on your counter! We spent this time painting our
kitchen and dining area bright yellow. During this time, I also decided that we were
just going to go for it and install a tile backsplash, since the whole room was already
in a shambles.

Ashley's messy dining room - work is in progress!

We did the tiling while the countertop was in its last few hours of drying, so we
could lean on the counter a little bit without worrying that we were leaving marks in
it.

Ashley's husband Eric helping with the tile

After some cleanup, we were finally done!

Ashley's new kitchen!

Ashley's new dining room

What a difference a DIY makes!

Ashley's kitchen before and after

Ashley's kitchen before and after

The counter has survived several parties and lots of food preparation. There are no
marks on it! The only thing to get used to is that using too wet of a rag to clean the
counter sometimes leaves water spots. Also, things don’t slide across the counter
anymore – they kind of just stop, which is harder to get used to that you would
think!

The end result is a fancy kitchen for a fraction of the price of a professional
renovation! And I even have the satisfaction of knowing that I did (most of) it
myself!


Thanks again for sharing all your photos and advice, Ashley!! 

Related Posts Plugin for WordPress, Blogger...